Pages

Showing posts with label Vegetarian. Show all posts

Thursday, November 12, 2015

Baked Perogies in Cream


Yes, me bad. It’s been a while since my last post. I do have lots to get down on my blog. Such as, I’ve been to a cookbook signing, I went to a few restaurants and my Thanksgiving meal menu (which hopefully, I’ll post for Christmas). I'll try and get myself into gear....


Today, I am sharing a really easy and affordable recipe. I got this yummy dish idea from my supervisor at work. It’s easy, it's decadent - but does take time (like all great things) but it’s worth it. 

Ingredients:

1 Bag of Frozen Perogies (your favorite brand, don’t defrost)
2-3 Onions, sliced 
and/or 2 cups of sliced Mushrooms
2 Tbsp. Oil (Sunflower, grape seed or corn, avoid olive oil)
1 Tbsp. of Butter
Salt and Pepper to taste
3/4 - 1 litre of Whipping Cream

Tools:

Fry pan, cutting board, knife, wooden spoon, lasagna pan, cookie sheet, serve spoon and foil.

Cook time: 1.5 - 2 hours and 30 minutes of prep time.

Serves: 4 Very hearty meals, or 6-8 side dish.

Preheat oven to 375. 

Lightly grease a shallow baking dish (like a lasagna pan) and place on top of a cookie sheet.

Slice the onions and/or the mushroom into somewhat thin slices. Heat the fry pan on medium heat, add the oil and sauté the onions/mushrooms until cooked or caramelized. I used onions, (had no mushrooms).


Just the right color...

I recommend to stir often, you don't want them to burn. I like my onions to turn somewhat a shade of light tan.  When you have your veggies cooked to your likeness, turn off the heat and put aside.

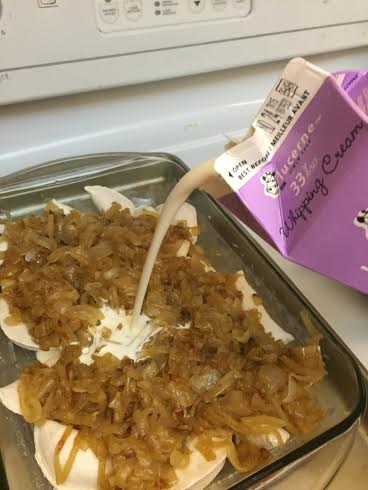
Empty the bag of frozen perogies into the baking dish, top with onions/mushrooms and spread it evenly.


Poor the whipping cream around the dish, making sure the perogies are covered. 

You might not need the whole carton. Just make sure the perogies are covered, since this is the liquid they are going to be cooked in. 

Shake a little salt and pepper on top to your liking.


Cover with foil and place into the oven. 

I keep the dish on top of a cook sheet in case there are any bubble overs. You won’t want to clean burnt cream on you oven.

Cook for 1.5 to 2 hours

See, there was a little boil over - good thing I had the cookie sheet

The cream will thicken and make the dish oh so decadent.

This is not a low calorie dish, but it’s the ultimate comfort food. Not sure how it would turn out if you use half n’ half, but I’m the kind of girl with an all or nothing thinking. I’ll have a salad tomorrow.


Until next time, 

Wednesday, April 22, 2015

Patience is a Virtue Onion Soup

My take on the classic French Onion Soup


Nothing beats hot soup on a cold day...topping it off with carbs and Cheese - Heaven!

This is one of my favorite comfort foods - a big bowl of steaming hot onion soup with croutons and cheese. I made this soup a few weeks ago when it was a bit on the cloudy outside and it suited the temperature. The one thing about this soup is you must be patient. This is truly a slow food, but anything that takes time is worth it. The trick to any onion soup is to caramelize of the onions. It is amazing how time and low heat can transform the noble onion to a soft, dark and gooey delight. This soup is not hard to make and tastes a thousand times better than the salt filled kind you find in packages.

Thin half moons

Ingredients:
6 – 8 Large Onions (about 8-10 cups) chopped into thin half-moons.
(You can use any kind, but my favorites are the large sweet yellow)
2 -3 Tbsp. of Butter (not margarine)
1 -2 Tbsp. of Oil (any cooking type, olive, canola or grapeseed)
2-3 Bay leaves
Salt and Fresh Black Pepper
1 Tea of Brown Sugar
1 Tea of dried Thyme
1 Cup Sherry (Bristol Cream is my favorite), 
or Wine or if you are able to give some up – good Cognac
1 Litre/4 cups of Broth (Beef, Chicken or even Vegetable – this dish can be vegan)

Toppings:
Add these items to your desired amount to the top of the soup:
- Shredded or sliced Cheese(s): 
You can use what you have. Classically, Gruyere is used, but Swiss, Cheddar or Havarti tastes good. If you can find Truffle Cheese - it's a splurge - but divine.
I use fresh Parmesan (not the kind sold in the shaker). 
Vegans – you can omit the cheese or use vegan cheeses that melts well. 

- Croutons: 
You can buy them packaged or toast some left over bread, let it cool and cut into pieces. Make some fancy ones of your own by brushing oils and spices/garlic onto the bread and toast in the oven. Use the bread you have or like.

- Other options: Chopped fresh green onions, drizzle of flavoured oils and fresh ground pepper.

Tools: Heavy bottom pot/dutch oven with lid, wooden spoon, chopping board, knife (or mandolin) measure tools and time – lots of time.

Time: a little over two hours
Serves: Four

Time to tear up! Peel and chop the onions or you can use a mandolin. A trick I use to stop me from tearing up is when I cut the onion in half; I rinse the inside with cold water.

The slices should be half-moons and to reduce cooking time, I recommend to slice as thinly as you can and please watch your fingers.
 
Sharp knife = happy life

One trick to chopping any vegetable is to have a SHARP knife. The other important step is to always pay attention to where your fingers are. Using a dull knife can actually be hazardous with it slipping off the item and ending up on your fingers. You should never need press hard to cut veggies. 
Next to a good set of cooking pot and pans, the equally important kitchen utensil it is a good knife. My husband is a huge fan of quality knives and on my picture is our first knife we bought at Knifewear.  The knife shown is handcrafted (which makes it one of kind) and is awesome to work with. As I mentioned before, I don’t get commission, so this paragraph is only a suggestion for future kitchen investment. If you are going to be needing a knife – invest in quality. We just like Japanese steel. Plus, the knife is pretty.

I will do post in the future about knives, but for now back to chopping/cooking....

Once all the onions are chopped, get your pot on the stove and heat to medium high. Melt the butter and add the oil. I add the oil to help the butter not burn. Add the onions and stir gently. 

The onions would be crowded, but after an hour – they will reduce substantially. Stir and add some salt and fresh ground pepper.  If the onions look like they are sticking, add a little water and stir. Reduce heat to medium/low and cover. Put a timer on for 5 minutes.
 
After half an hour....

After the timer goes, stir the onions to make sure they're not sticking. Cover and put again a timer for another 5-10 minutes. You don’t need to be next to the stove the whole time. I recommend having the heat around less than medium, but check on the onions once and a while to make sure they are not burning to the bottom of the pan.

After half an hour, of checking on the onions - I like to put in my Bay Leaves, Thyme and a little more salt/pepper.  Stir, cover and keep checking on the onions for another half hour. This is why this soup is slow and you can't rush goodness. 

Not yet...still too light for me

The onions will eventually reduce and turn a rich brown and that’s what we want. 

If the onions are starting to get too "liquidly", since they are releasing it's water content - I partially cover the pot to let some of the steam evaporate.
 
Ah, Just right!

When the onions turn a shade of rich brown and are reduced to less than a quarter of what you started with – add the sherry and the sugar, and deglaze the pan.
Deglazing is adding liquid and scrapping the bottom of the pan (with a wooden spoon) to remove the rich and yummy toasty bits.
 
My favorite cooking ingredient....

When the sherry is reduced, add the broth. The broth should cover the onions at least by an inch. Increase the heat and boil for a minute or two. 

Take a taste test (remember it's hot - watch your tongue) and see if you need more salt or pepper.


Partially cover and reduce the heat to low and let it simmer for 10-15 minutes. I told you this soup takes time.

To serve, ladle into a bowl and top with croutons and cheese. The steam will melt the cheese – but if you have those awesome onion soup bowls – add lots of cheese and put under the oven broiler.

Sadly, I don’t have onion soup bowls – so I just let the steam melt the cheesy goodness. I need to visit some garage sales this summer and see if anyone one has those retro French Onion Soup bowls with the handle.

This brings back memories...

Like most soups, this will taste really good the next day. That's if you have any left...
If you have any leftovers – ladle into storage food container, refrigerate without the croutons, and cheese of course.  It should keep for 3-4 days in the refrigerator.

Enjoy.


Sunday, April 5, 2015

Time to Pucker Up Lemon Cake

Lemon cake with Pudding and Limonata Pop


This cake is my contribution to my families Easter brunch/lunch today. I actually love the taste of lemon, I’ll take lemon over classics like chocolate or vanilla any day. Being Easter, I wanted something on the tart side and was the color of my favorite flower – the yellow daffodil.

This recipe is a take on another cake recipe that uses: cake mix, instant pudding mix and a can of pop. I used in my cake - lemon cake mix, lemon pudding (yes, there is lemon pudding out there) and Limonata pop. 

You can pick up this pop now almost anywhere now. I’ve seen it sold at grocery stores, Italian Centre and even London Drugs. The pop is from Italy and it’s made by San Pellegrino. They have other flavors available (orange, blood orange and grapefruit) I actually prefer this pop over others since it uses real sugar and fruit juice.

The cake is easy and super moist. It’s also very refreshing and great for any spring celebration.

Ingredients:
1 box of Lemon Cake Mix, 432 g
1 box of Lemon pudding Mix, 99 g
1 can of Limonata soda pop. 330 ml
1 cup of Oil (Canola, vegetable or corn)
3 Eggs, beaten
Cooking spray, butter or oil to grease the cake pan
Dash of flour to dust the cake pan


Icing:
1 Lemon, fresh and juiced completely (don't use bottled lemon juice)
1 cup of Icing Sugar
Pinch of Salt

Tools:  Sifter or strainer, large mixing bowl, hand mixer or mix master, wooden spoon, small bowls, whisk, tooth picks, juicer, measure cups, and a Bundt pan/cake pan.

Time:  +1 hour - Cook time 40 minutes, prep time 10 minutes and cooling time.

Preheat oven to 350

Grease the Bundt or cake pan and dust/sprinkle lightly with flour.

In a large bowl, sift the cake mix and pudding. This helps with mixing the batter smoother, since sometimes those packaged cake mixes can be clumpy.
Getting all the clumps out

Beat the eggs in a small bowl. I try to avoid putting eggs straight into the batter for two reasons: 1. beating the eggs separately helps with mixing and 2. If there a bad egg in the group or shell pieces, you can redo it no problem - if it’s in the batter – you lost a lot of ingredients.

Add the eggs, oil and soda pop to the dry ingredients. Stir with a spoon just to incorporate the ingredients. Then use the hand mixer/mix master for 2-3 minutes on medium speed. Don’t over beat the batter.

When the batter is all mixed up well, pour into the greased cake pan. Give the pan a little shake to make sure the batter is evenly spread. I then take a butter knife and run in the batter once or twice around to remove any air pockets in the batter.


Place into the preheated oven and cook for 40 minutes. 

If you are using another type of cake pan, try 30 minutes first and check the cake and determine if the cake needs more time or not. I usually test around 35 mark with a knife. If the knife comes out clean the cake is cooked.

Remove from oven and let the cake rest in the pan until it is completely cool. Do not try to remove a warm cake from the pan.  Not a pretty sight.


Making the icing:

In a small bowl, add the juice of the lemon and gently sift in the icing sugar little by little to to get a thick syrup like icing. You might need more or less icing sugar (depending on the size of the lemon or the thickness you like).

Once you get the consistency of the icing you prefer, add the salt and stir. The salt balances the sweet and sour.

When the cake is cooled off, flip it onto a serving platter or plate. I then take a toothpick and do a few pokes on the cake just to get the icing to seep or soak in a little.

Poor or spoon the icing sauce over the cake.

Let it stand either in the fridge or on the counter covered for 15 minutes to let the icing take hold.


Enjoy!

Wednesday, March 18, 2015

Luck of the Green Goddess Dip - A St Patrick's Day Potluck at Work

Green Goddess Dip

Yesterday, at work we had a St. Patrick's day potluck. 

I work with a great group of people and our kitchen is always filled with some sort goodies. We all came together and celebrated St Paddy's day!

Everyone brought a little something, and I brought my Green Goddess bean dip. I wanted something to suit the color of St Patty's day - GREEN!  

I think it went over well, since I took home a clean travel container.
Green Goddess dip with chips, served on the only platter I could find in the office kitchen - it's Christmas theme.
This dip is really easy to make with a food processor. It's vegan and it has no gluten (other than the dipping vessel), it carries well and keeps in the fridge for a few days (if it can last that long).

No need to heat up and easy to carry on the bus. It's also high protein and it's Paddy day friendly.


Time to make: 30 minutes
Serves: 10 people as a potluck dip

Ingredients:

2 cans of White Kidney beans, 540 ml each can
2-3 cloves of garlic, roughly chopped (you can more or less to your taste)
1-2 Limes, juice
1/2 cup of Good quality Extra Virgin Olive Oil
1/2 cup* water (could use more or less depending on the the thickness you like)
1 cup of Arugula, washed and coarse chopped
1/2 bunch of Flat Leaf Parsley, washed and coarsely chopped
1/4 bunch of Cilantro, washed and coarsely chopped* (don't like? don't use)
5-6 Large leaves of Basil
10 small leaves of Mint
Salt and Fresh Ground Pepper
Dash of smoked Paprika

Dipping vessels: your choice - crackers, taco chips, bread, carrots or your favorite dipping vegetables.

Tools:  Chop board, knife, colander, food processor, citrus juicer, spoon and serving bowl.

Open and drain the cans of beans in a colander.  Rinse the beans thoroughly with water. When you notice bubbles on the beans, that means that there is a lot of sodium. Rinse with water until you notice the bubbles are gone.  

Shake the beans well, and place into the food processor.  Add the chopped garlic, and the greens.  Swirl (on low) a few times in the food processor, stop and with a spoon push down sides then add the juice of of the limes, salt, pepper and a dash of paprika.  Swirl again on low.
*If you don't have Arugula, that's ok - use more parsley.  Have spinach? That's good too.  Don't have basil or mint - no problem!  This dip is forgiving, and you can use your favourite green leafy vegetable.  Except - lettuces, they turn brown and get watery.

As it's swirling on low, add the olive oil.  If you like olive you you can add more than listed, if you wish, but if you are trying to keep it low in fat - use water (a little at a time).  

Stop and take a taste test. 

Does it need more salt/pepper?  Too thick - add more water/oil. Too sour? - add a pinch of sugar to counter act it.  Swirl until smooth.

Place into a bowl, cover and refrigerate for 1 hours before serving.  The more it sits the better the flavors mingle.  Tastes really good the next day.

Serve with your favourite dipping vessels: crackers, bread, carrots - etc.
The spread at the potluck. yummy lunch!
Even though this is a dip, I don't see why it cannot be used on top of pasta or rice to make it a complete meal.  It's beans, so it heats well.  I think I'll try making it as a sauce the next time I make it.

Enjoy.

Sunday, March 15, 2015

Day of Pi - March 14 (3.14) Banoffee Pie

Banoffee Pie


Yesterday, March 14th was PIE day (3/14).  If you remembered math back in school, pi (3.14) was the number used to calculate equations with circles.  Not an officially holiday, but why not celebrate with a desert rather than a math equation.

My homemade Banoffee pie
In honour of pie day I wanted to make - Banoffee pie.  You may ask what is that?  Take toffee and bananas, with whip cream - and there's your pie.  The history of the pie originated in the pubs of UK. I've always loved pub food.  Lucky for us, it came across the pond.  Plus, as some people who know me, I'm not much of a baker - this is a no bake pie.

Now if you want to try Banoffee pie like it's supposed to be - go to Urban Diner.  As a recommendation by the waitress, I tried a slice and I was hooked. It's delicious! I always get a slice when I'm at the restaurant - plus they make really good comfort food there too.

With all due respect to apple, cherry and pumpkin pie - Banoffee has taken first prize in my personal pie contest.

My first attempt at making this desert turned out very tasty - but runny.  Sad, since I followed a recipe from one of my favorite celebrity chefs and food goddesses: Nigella Lawson (NL) - see the recipe here.  I thought I had found the perfect launch pad to make this desert, but it didn't come out as I hoped for.  (I still think she's a goddess - I heart her) I think Urban Diners' Banoffee is a hard act to follow.

My hubby always mentions I never really follow recipes or directions well (cause deep down I'm a rebel!). I like to look at recipes and think: I wonder what would happen if I added this?...or hum, I bet it'll taste better if I removed this and added this... Though, with this recipe I DID follow Nigella's instructions (I only tweaked the banana part and added Skor pieces to the topping).  So OK, I followed the basics of the recipe - but added my spin. Maybe I just can't help it.

Next time, I'll make it with one can of condensed milk, instead of two (it was too rich and it ran a bit) and I'll cook the milk longer. My condensed milk at 2.5 hours looked like a light tan color, not a rich caramel color. I might even grease the plate to let the crust come off easier. Plus, I'll add MORE bananas. My cooked bananas was tasty, and would be a great topping for any cake or ice cream. 

So, even though this wasn't my best pie/desert attempt in looks only - it still tasted really really good (hubby and I already had two slices - OK, three). We never had a "slice", it was almost a scoop. Maybe, in your kitchen - it will turn out fine.  

In any case I will prevail in making a better Banofee pie. That will be my mission.

Banoffee Pie 
2.5 -3 hours cook time for toffee, and cooling time - Next time I'm cooking longer 3-4 hours
15-30 minutes assembly
set overnight

Ingredients:

Crust:
16-18 Digestive Cookies (plain flavour)
1/2 cup Butter (1 stick)

Filling:
2 cans of Condensed Milk (375 ml)  - Next time, I'm using 1 can
2 Large Bananas, sliced - Next time, more bananas!
2 tbs Butter
Pinch of Salt
1 tea of Brown Sugar
2-3 tbs of Water *only if you need, you can add more or less
1/2 tea of Vanilla 

Topping
1 cup of Whipping Cream
2 Skor bars or 1/2 cup of toffee bits

Tools:  Pie plate, fry pan, food processor, microwave safe bowl, measure cups/spoons, spatula, hand mixer, large bowl (for whipping cream) and a large pot.

Toffee:
Do the night or day before: boil the tins.
*If you are lucky to find a tin of toffee or Dulce De Leche you can use it instead.  They are sold at some stores, but I wanted to follow Nigella's recipe.

To make your own toffee, take the two tins of condensed milk, remove the paper labels and place into a large pot of water.  Do not open the tins.  You are going to boil the milk inside the tins. 

Make sure the tins are submerged in water (at least 3" of water above the top of the tin) Boil the water and the tins for 2 - 3 hours.  

Make sure that the water doesn't evaporate - this is very important.  As noted from NL: "BE SURE THAT THE TINS ARE SUBMERGED IN WATER AT ALL TIMES - OR ELSE YOU WILL BE CLEANING THE CEILING!!!" Her words, not mine. 

Once the time has passed, let the tins cool off completely. 

As I mentioned above, I think I'd use one can of condensed milk instead of two and I'm going for 3.5 hours next time. Goal - I want my toffee to look like Urban Diner's.

Boiling the tins

Crust:
*You can use a ready made graham crust. No judgments here.

Place the cookies in the food processor and pulse until they are sandy crumbs.  In a microwave safe bowl, melt the butter and mix with the crumbs.  Press onto the bottom and sides of the pie plate. 


Next time, I might lightly grease the pan and I placed the pressed crumb plate in the freezer for 5 minutes to harden and set the butter. 

Filling: 
NL used raw banana's (you can too) - but my rebel heart I did this:
In a fry pan, melt the butter in medium heat, add sliced bananas, vanilla, pinch of salt and the brown sugar. Stir, if it gets sticky - add a few tbs of water just to help out. Don't add too much water. Once the bananas start to soften more and turn a bit creamy (about 2-3 min) remove from heat. Make sure it's not runny. Let it cool.

Yummy bananas!

Open the can(s) of cooked condensed milk, and poor into the crust. Spread with a spoon or spatula. (I should have seen that one can was enough - but I was following instructions).

Then spread the bananas and on top of the toffee.


Topping:
In a large bowl add the whipping cream and whip with the hand mixer until it's thick and peaks form.
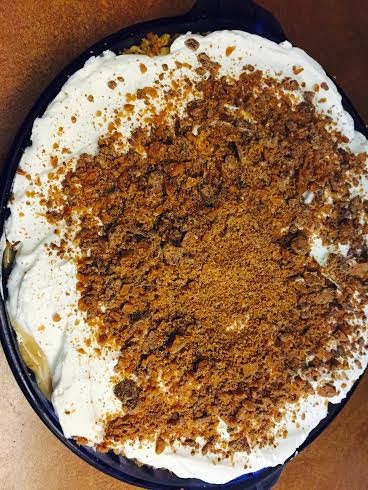
Spread on top of the bananas.


I use a chilled stainless steal bowl to make whip the cream and I place a large piece of parchment paper around the mixer to reduce splatter.  I'm glad that that their isn't any additional sugar added to the whip cream, the toffee is rich enough.

Place the broken pieces of Skor bar into a food processor and pulse until it its crumbs. Shake over the whip cream.  (This is my contribution - how can you not like Skor on top of anything?)

Cover the pie and serve or refrigerate until serving.
A bit runny - but still yummy
Even if this pie ended up runny and a little messy - it's still really good.  Maybe in the next couple of months I'll attempt this again from what I learned yesterday.  That is what's great thing about cooking.  You are always learning, even if you end up with a runny pie as long as it tastes good - enjoy it.  People are always looking for perfection - even at the first attempt. I see cooking, as in everything else in life - it's progress that counts, not perfection.  
My hubby an I had a runny pie - no big deal.  It hit the spot after dinner, (and again as a midnight snack).  

Enjoy and see you next time.  And Nigella - I still idolize you!


Saturday, February 21, 2015

Spinach and Strawberry Salad

Spinach and Strawberry Salad with Almonds and Goat Cheese

Ah, spinach and strawberries!  This salad says summer, even though it's still February.  


It's easy and pretty tasty (in my opinion).  If you are packing this for lunch the next day, I recommend not adding the dressing until you serve.  

This recipe has red onion. If you hate onion, you can leave it out - but, I like red onion, it gives a contrast to the sweet strawberries. The trick to not let the onion overpower the salad, is to let the red onion soak in some lime juice.  I heard this somewhere that the lime juice changes the sharpness. I've tried this method a few times and it works.  You can use the lime juice afterward in the dressing. The onion flavour doesn't transfer over in the liquid.  


4-5 cups of Spinach, washed and spun dry
1 cup of sliced Strawberries
4 tbs of sliced Almonds
1/8 of small Red onion, thinly sliced in rings
3-4 tbs of Goat Cheese, crumbled (or your favourite mild cheese)

Dressing:
4 tbs of Extra Virgin Olive Oil (good quality)
Juice of 1/2 a Lime
Dash of Salt and some fresh ground pepper
1 tea of honey

Tools: Large salad bowl, small bowl, salad spinner, knife, cut board, juicer, salad tongs, whisk or fork.

Step 1:
In a small bowl, put the sliced onion with the lime juice.  Let it sit and marinate in the juice for a few a few minutes.  The juice will turn a slight pink color.  Remove the onions, but don't throw out the juice - you'll need it for the dressing.

Step 2:
In a large bowl add the spinach, top with strawberries, almonds, onions (post marinated in lime juice) and  crumble the cheese.  

Step 3:
In the small bowl with the lime juice, add the rest of the dressing ingredients and whisk well. Taste and adjust the seasoning if you like.

Add the dressing right before you are going to serve.  You can drizzle and mix together, or plate the salad and let people spoon the desired dressing they want to have.

Enjoy.

Sunday, February 15, 2015

Valentine's Dessert - Chocolate and PB heaven

Peanut Butter and Chocolate Tart

Do you like peanut butter and rich chocolate together?
Then this tart is for you.

This recipe is actually two recipes that I merged together.  The peanut butter crust comes from Kraft Canada – from their Peanut Butter Cookie recipe located here.  Instead of making cookies, I used the dough and made the crust for my tart.


The chocolate decadence comes from Rachel Ray, she made Pots de Creme recipe on the Oprah Show years back, but you can find it here.  Instead of pouring the chocolate into small cups, I pour it into the cooked peanut butter crust.


Here's my merge of the two recipes:


Ingredients:

Crust:
1 cup Peanut Butter, smooth is best
1/2 cup Sugar
1 tea of Vanilla
1 large Egg (room temp, lightly beaten)

Filling:
2/3 cup of Homo Milk (don’t use 2% or nonfat)
1 large Egg (room temp) lightly beaten
2 Tbs Sugar
Pinch of salt
1 cup of Good quality Semi Sweet Chocolate chips
2 Tbs of either Frangelico or any chocolate Liqueur (optional)

Topping: (optional)
2 cups of Whipped Cream or cool whip (optional)

Tools:  Mixing bowl, small bowl, measure cups and spoons, stir spoon, 9” spring form pan or pie plate, blender or food processor, sauce pan/pot.

Step 1:

Preheat oven to 325.  In a mixing bowl, mix all the crust ingredients together with a spoon.  


Take the dough and press on the bottom of the pan to make the crust.  Make sure the dough is pressed evenly throughout the pan and up the sides about ½   ¾” to hold in the filling.  Take a fork and pierce the bottom only a 2-3 times to release steam.


Bake, for about 10-15 minutes until it’s golden brown.  Remove and let it cool completely before going to step 2.

Step 2:

Heat the milk in the sauce pan until it almost comes to a boil.  Must be hot, too hot to drink but not boiling.  Don't let the milk separate.

Put the rest of the filling items in a blender or processor.  
Add the hot milk slowing as you slowing whip together.  Go in stages. The hot milk will cook the egg and melt the chocolate.


Once all the milk has been used and the chocolate is melted, take the liquid and pour over the cool crust.  Make sure the liquid is spread over the crust equally.

Cover with plastic wrap and refrigerate for 1 – 2 hours to set.

Step 3:
Remove the sides of the spring form (gently) and place onto a serving dish.  If you can remove from the bottom, try but don't force.  You can cut into the tart using a dull edge.

Serve with whip cream on the side, or on top if you wish (optional).

This is the chocolate I used.  It's delicious!


Enjoy!